
Your first 10 minutes — quick tour
This quick tour introduces the five key areas of the Site Designer interface. By the end, you’ll know where everything lives and how to start building.
Where things are
Four zones, and that is the whole map:
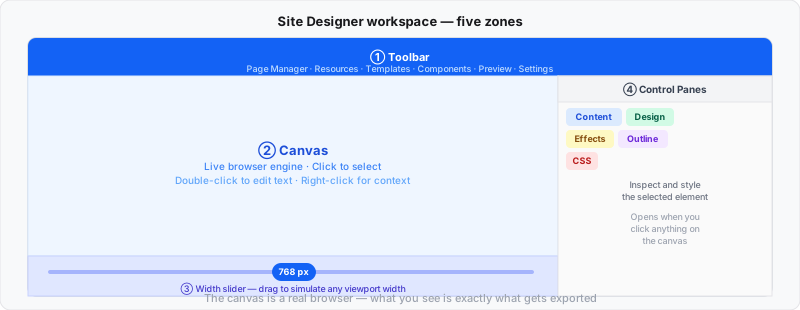
- Toolbar, across the top: pages, resources, components, preview, settings.
- Canvas, in the middle: the live browser preview you design on.
- Width slider, under the canvas: drag it to see any screen width.
- Control panes, down the right: everything about the selected element.
That is enough to follow this tour. When you want each zone broken down control by control, workspace at a glance is the reference.
Try it: open the toolbar
The toolbar at the top gives you access to global project tools:
| Icon | Tool | What it does |
|---|---|---|
| Pages icon | Page Manager | Add, rename, reorder, and delete pages |
| Image icon | Resources | Manage images, fonts, and files |
| Layout icon | Templates | Browse and apply page templates |
| Component icon | Components | Insert pre-built component blocks |
| Eye icon | Live Preview | Open a live preview in your browser |
| Settings icon | Settings | Export, publish, and project settings |
Try it: select something on the canvas
The canvas is a real browser engine — not a simulation. Click any element to select it. A blue highlight border appears around the selected element.
Basic canvas interactions:
- Click — select an element
- Double-click — enter inline text editing
- Right-click — open the context menu (duplicate, delete, move)
- Drag — move an element (hold and drag the selection handle)
Try it: change a style
Click any element on the canvas and the right-side panes populate with its properties:
Content pane — Add elements, components and symbols to the page.
Styles pane — Classes, IDs and states at the top; below that, Layout, Design and Effects controls for everything CSS.
Element pane — The page-inspector tree, the element’s property fields (link targets, image sources, custom attributes), and a read-only preview of the CSS applied to it.
Try it: add an element
Drag any element from the Components panel in the toolbar onto the canvas, or use right-click → Insert to add elements inline.
After dropping:
- The element is selected automatically.
- The Element pane shows its editable properties.
- The Styles pane shows all style controls.
Try it: drag the width slider
At the bottom of the canvas, a width slider lets you preview your design at any viewport width. Drag it left to simulate narrow screens, right for wide displays.
What’s next
Now that you know the interface, pick a path:
- Build from scratch → Choosing a framework
- Start quick with a template → Choose a template
- Dive into the canvas → Canvas overview
- Learn about styling → Classes & selectors